web developer and learner. Love to talk about society, education and religion.(I don't pray though) Wish to travel a bit more. started reading again after 8 yrs
42 stories
·
1 follower

We Built a Production Agent (and Open-Sourced Everything We Learned)

1 Share

A behind-the-scenes look at how we built Eon, learned from it, and open-sourced every component.

Agents are the new developers. 

They read, write, and build on our behalf. But the systems they rely on were designed for humans. Agents need infrastructure that can remember context, reason over data, and act in real time.

At Tiger Data, we set out to build that foundation: a database built for agents. But before we could build for them, we needed to understand what it actually takes for one to work in the real world.

So we built Eon, a Slack-native assistant that turns institutional knowledge into instant answers. Within 6 weeks, nearly 50% of the company has been using it every day.

Slack was the perfect environment for the experiment. It’s where our fully remote team works, makes decisions, and shares context daily. It’s also a natural medium for conversation. Tools like ChatGPT, Claude Desktop, and Claude Code have already made chat the default interface for language models. We wanted Eon to feel the same way: like another teammate, but with perfect recall.

Building Eon taught us what agents truly need to operate in the real world: memory, context, and reliability. Each began as an engineering challenge and became an open-source component.

Over six weeks, we tackled three fundamental problems. First, we had to give Eon conversational memory—the ability to follow context across threaded discussions. Then, we needed to provide focused context from our entire knowledge-stack: GitHub, Linear, and documentation. Finally, we had to make it reliable enough that half the company could depend on it daily. Here's how we solved each, what we learned, and what we open-sourced along the way.

(If you want to skip the story and start building, below are the names of the open-source repos. Or jump to Eon: Putting It All Together.) 

We will begin with the first challenge every agent faces: memory.

Challenge 1: Building Memory That Understands Time

Making Eon feel natural meant solving a fundamental problem: conversation. When humans chat, we follow the flow of the conversation. Singular statements or questions in isolation can be considerably vague and confusing, but make perfect sense when taken in context. We wanted Eon to do the same.

When a user mentions Eon in a message, Slack sends an app_mention event that contains only that single message. There is no thread context or conversation history. Users could include all the background in every question, but that would break the illusion of chatting with a teammate. 

We needed Eon to remember what happened before and understand how conversations evolve. Memory, we realized, isn’t just storage, it’s also time: the sequence, order, and relationships between messages.

That insight reframed the problem. Slack conversations are time-series data. Events unfold moment by moment, each with a timestamp, sender, channel, and parent message. Their natural structure is temporal, and TimescaleDB was built to reason over time.

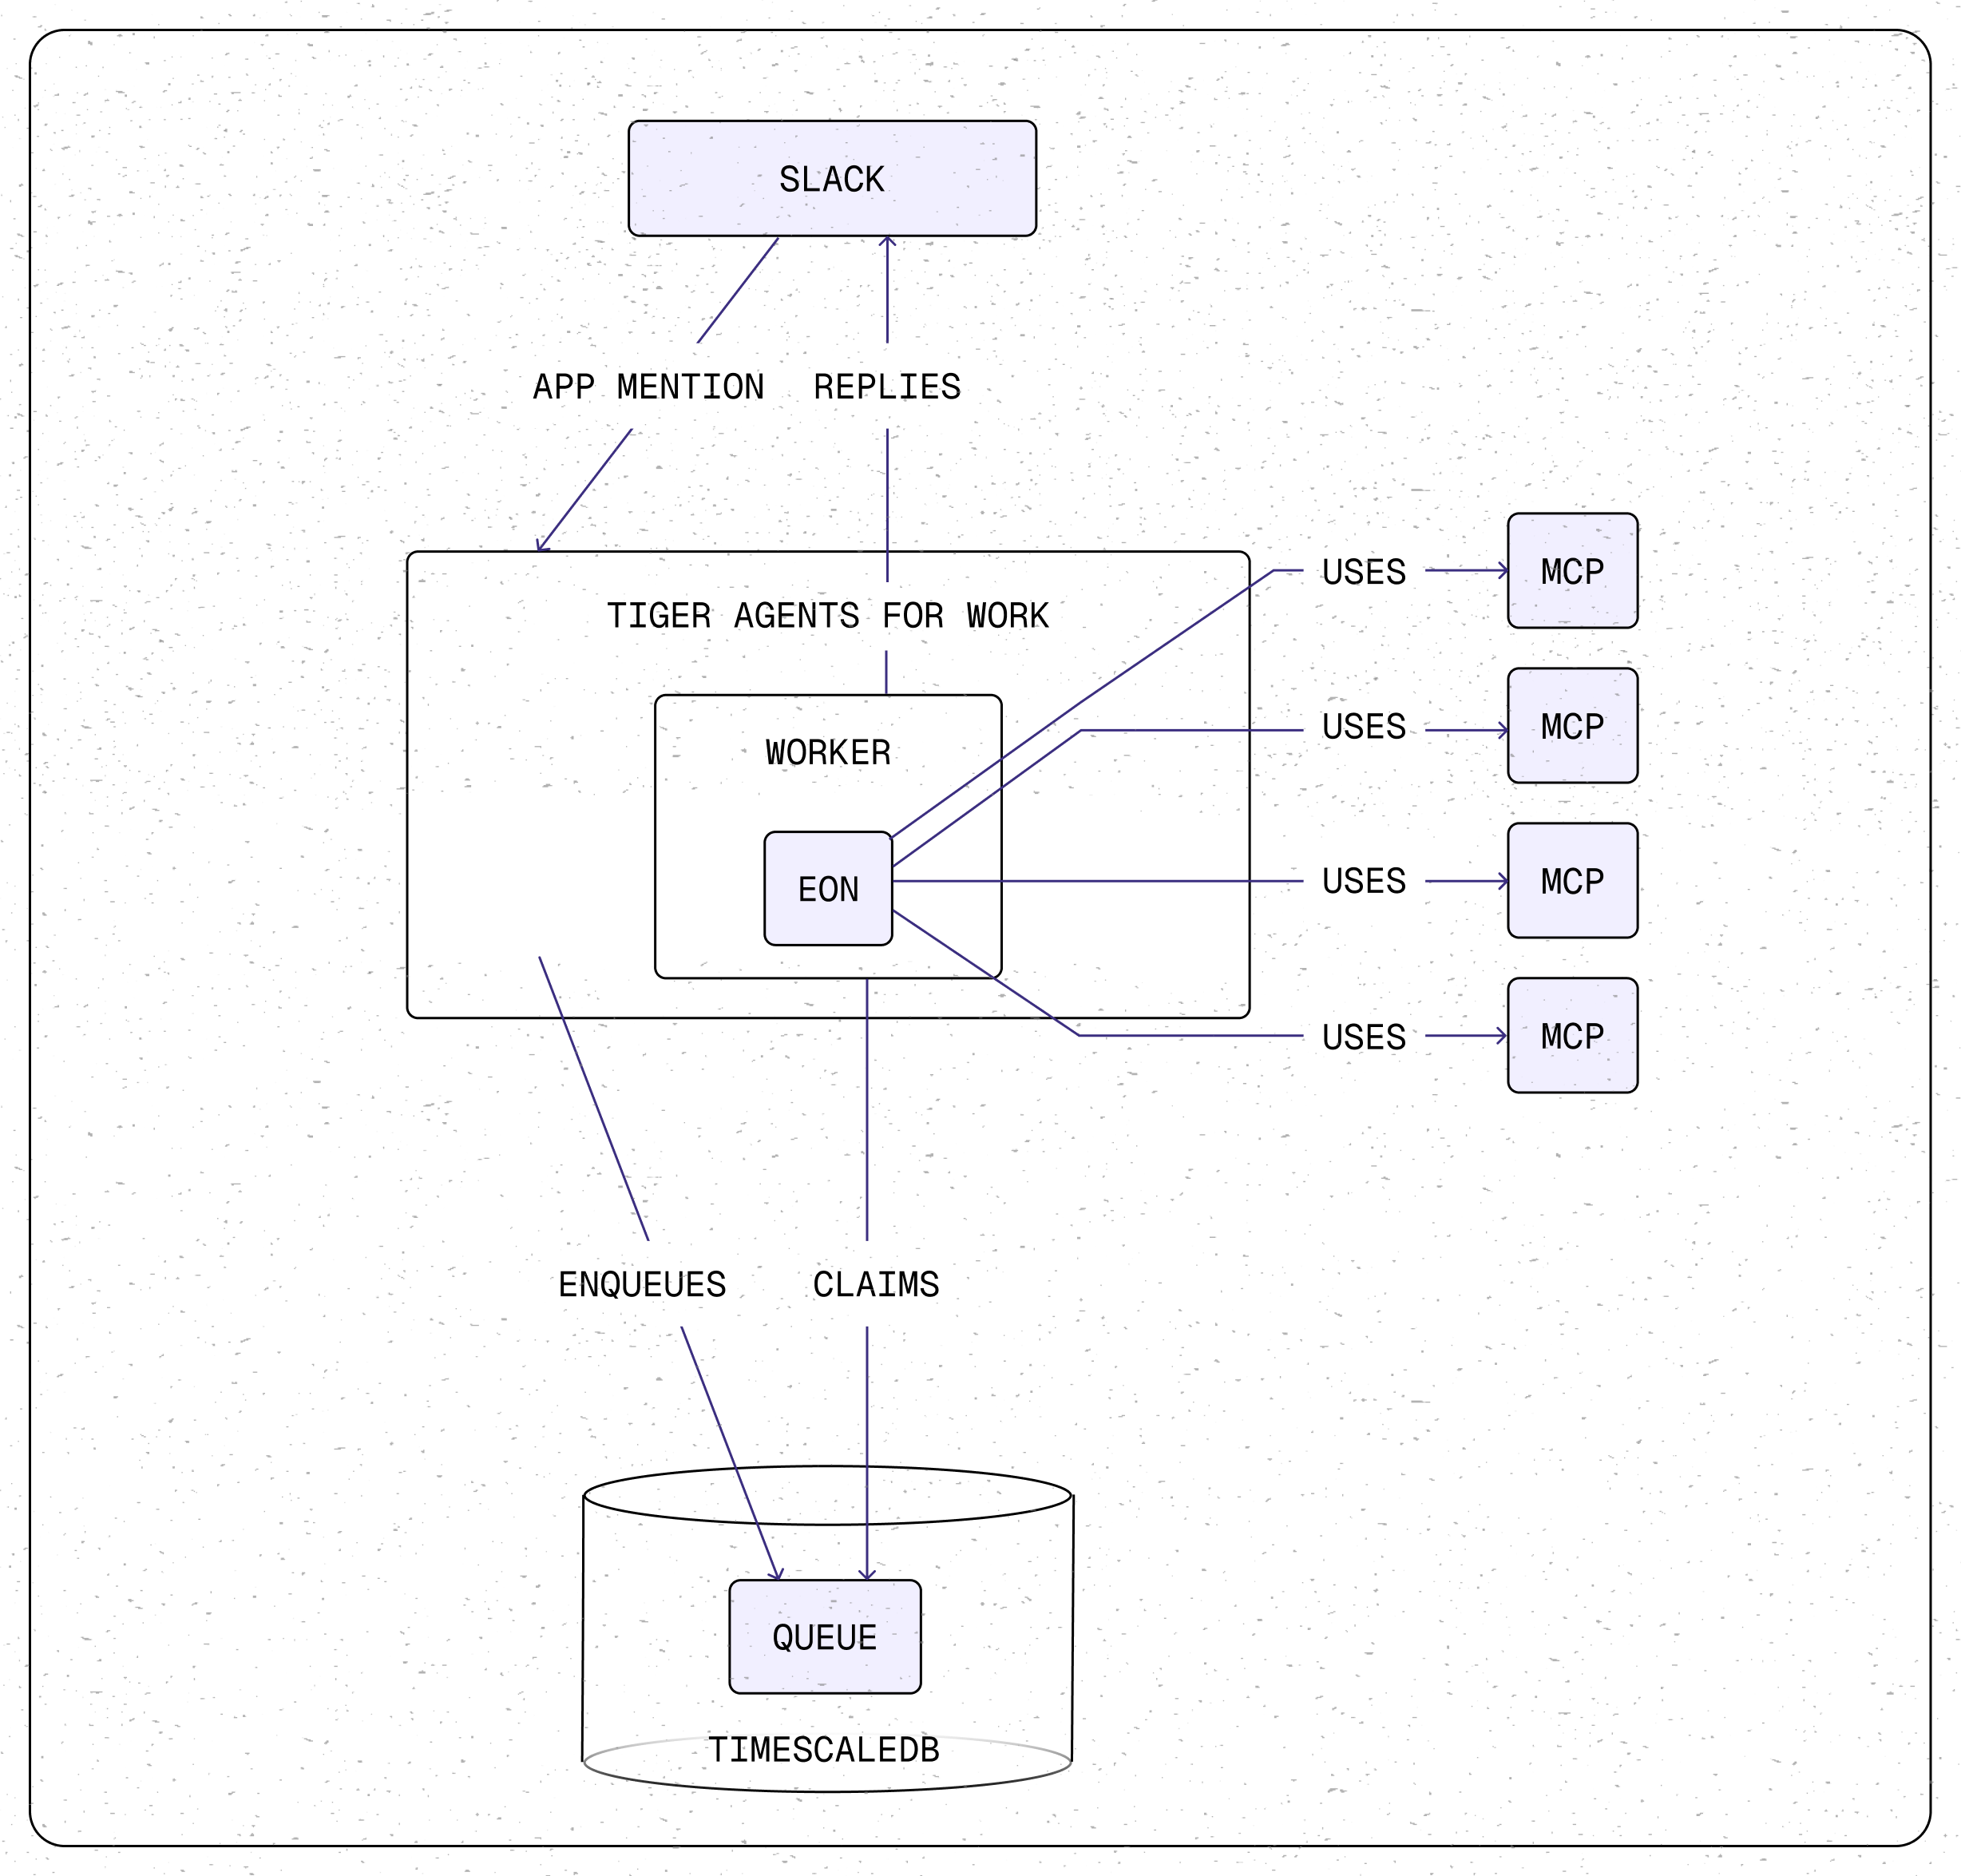
So we built a real-time ingestion system that captures every message, reaction, edit, and update from Slack—and can also backfill years of history from exports. All data flows into TimescaleDB, where it’s queried directly using SQL with no rate limits or complex APIs to wrangle.

This gave Eon conversational memory—the ability to recall what was said, when, and by whom—and revealed something deeper: building memory means building systems that understand time. That's something TimescaleDB handles naturally.

We open-sourced this as tiger-slack: a production-ready system for Slack ingestion and conversational memory storage in TimescaleDB.

Challenge 2: Providing Context Without Noise

Eon had conversational memory, but needed additional context. Slack holds a wealth of institutional knowledge, but it’s not the whole picture. Engineering discussions happen in GitHub pull requests. Progress is tracked in Linear tickets. Technical answers sit deep in documentation. To be truly useful, Eon needed access to all of it.

That's where the Model Context Protocol (MCP) came in. It provides a standard for connecting agents to external tools and data. Instead of wiring integrations directly into Eon, we built small, composable MCP servers, each focused on a single source of context.

But here's what we learned: not all MCP servers are created equal.

Official MCP servers exist for GitHub and Linear, but they're designed for general-purpose assistants. They expose dozens of tools across every API endpoint. That flexibility is useful for broad assistants, but inefficient for a focused one like Eon. Too many tools increase token usage, raise cognitive load for the model, and make errors more likely.

Filtering those tools down doesn't solve the problem. The official versions are wrappers around APIs that are themselves wrappers around database schemas. Getting the needed information often requires multiple tool calls and stitching together results—something an LLM can do—but unreliably and at high token cost.

Instead, we built MCP servers with tools designed around what users actually ask for, not around API endpoints. These tools provide just enough high-quality context that the agent can execute its task effectively–no more, no less. This is context engineering at work.

For example, in our tiger-linear-mcp-server, we created a get_issues tool with a simple interface:

get_issues(user_id, project_id, updated_after)

Under the hood, this makes numerous calls to the Linear API: first, it fetches the filtered set of issues, and then for each issue, it fetches comments, attachments, label details, project details, state, team information, and user details. It caches everything to avoid duplicate requests and projects it into a clean, understandable object shape with no duplication.

An LLM could theoretically assemble that sequence using the official Linear MCP server, but it would be slower, less reliable, and far more expensive in tokens. We provide a single tool that does exactly what our users need.

For GitHub, we built focused tools for searching pull requests, retrieving issue discussions, and summarizing commit history. No repository management. No CI/CD controls. Just read-only access to the information that answers users' questions.

For documentation, we built a semantic search engine over PostgreSQL, TimescaleDB, and Tiger Cloud docs, powered by pgvector. It also includes expertly written auto-discovered prompt templates with knowledge about common tasks like schema design. When someone asks a technical question, Eon retrieves and cites the real docs. Unlike "prompt libraries" released by other companies, you don't need to copy and paste some PROMPT.md into your code; your coding agent automatically makes that decision itself. It's seamless, and you don't need to think about it.

This modular design means each component can evolve independently. We've improved our documentation search three times without touching Eon's core. We've added new GitHub query patterns based on user questions, without changing a single line of agent logic. Want to add Salesforce data? Build a new MCP server, plug it in, and test it. That's the power of focused, composable context.

We open-sourced all of it: tiger-gh-mcp-server for GitHub, tiger-linear-mcp-server for Linear, and tiger-docs-mcp-server for documentation search. The docs server is also publicly available at mcp.tigerdata.com/docs—add it to Claude Desktop or Claude Code to bring PostgreSQL and TimescaleDB expertise into every session.

Challenge 3: Making It Reliable

MCP servers solved the context problem, but we still had to tackle another essential one: reliability.

When nearly half your company depends on an agent for answers, it can’t just work most of the time. Every question matters, and every answer removes a potential obstacle. We wanted Eon to deliver consistently.

Let's be clear: errors happen. And when working with non-deterministic systems, like an LLM, unexpected things occur frequently. Most Slack bot tutorials show you how to respond to an event, but not how to handle the realities of production. What happens when your bot crashes mid-conversation? What happens when the GitHub API goes down? What happens under load when dozens of people are asking questions simultaneously?

We're a database company. We know how to build durable, reliable systems. So we built a production-ready library for Slack-native agents with four core capabilities:

Durable event processing: Each Slack event is written to Postgres before we attempt to process it. If the bot crashes, no events are lost, they remain in the queue to be processed. Workers claim events using row-level locking, which allows multiple bot instances to run concurrently without conflicts.

Automatic retries: Events that fail are left in the queue and automatically retried up to three times with a ten-minute delay to give transient issues time to resolve. In practice, this means virtually every user question gets answered.

Bounded Concurrency: We use fixed-size worker pools to prevent resource exhaustion. When traffic spikes, the system doesn't crash. Instead, it processes events as quickly as possible, queuing the rest in PostgreSQL until workers become available.

Millisecond latency: Workers poll the queue table to claim events, which naturally handles retries and recovery. But polling introduces latency. We didn't want users waiting for the next poll cycle, so we use asynchronous signaling to "poke" a random worker immediately when a new event arrives. The result: Eon typically responds in milliseconds, even though it's built on a durable queue.

The result is a Slack agent that feels instant to users but is built like production infrastructure: durable, observable, and horizontally scalable.

We open-sourced this as tiger-agents-for-work: a library that handles all the production infrastructure, so you can focus on your agent's logic, not durable queues and retry mechanisms.

Eon: Putting It All Together

tiger-eon is our reference implementation, a lightly edited version of the Slack agent we deployed internally, which our team uses daily. It's also a blueprint for assembling these building blocks into a functioning system. You can easily install and try it out using a simple installation script.

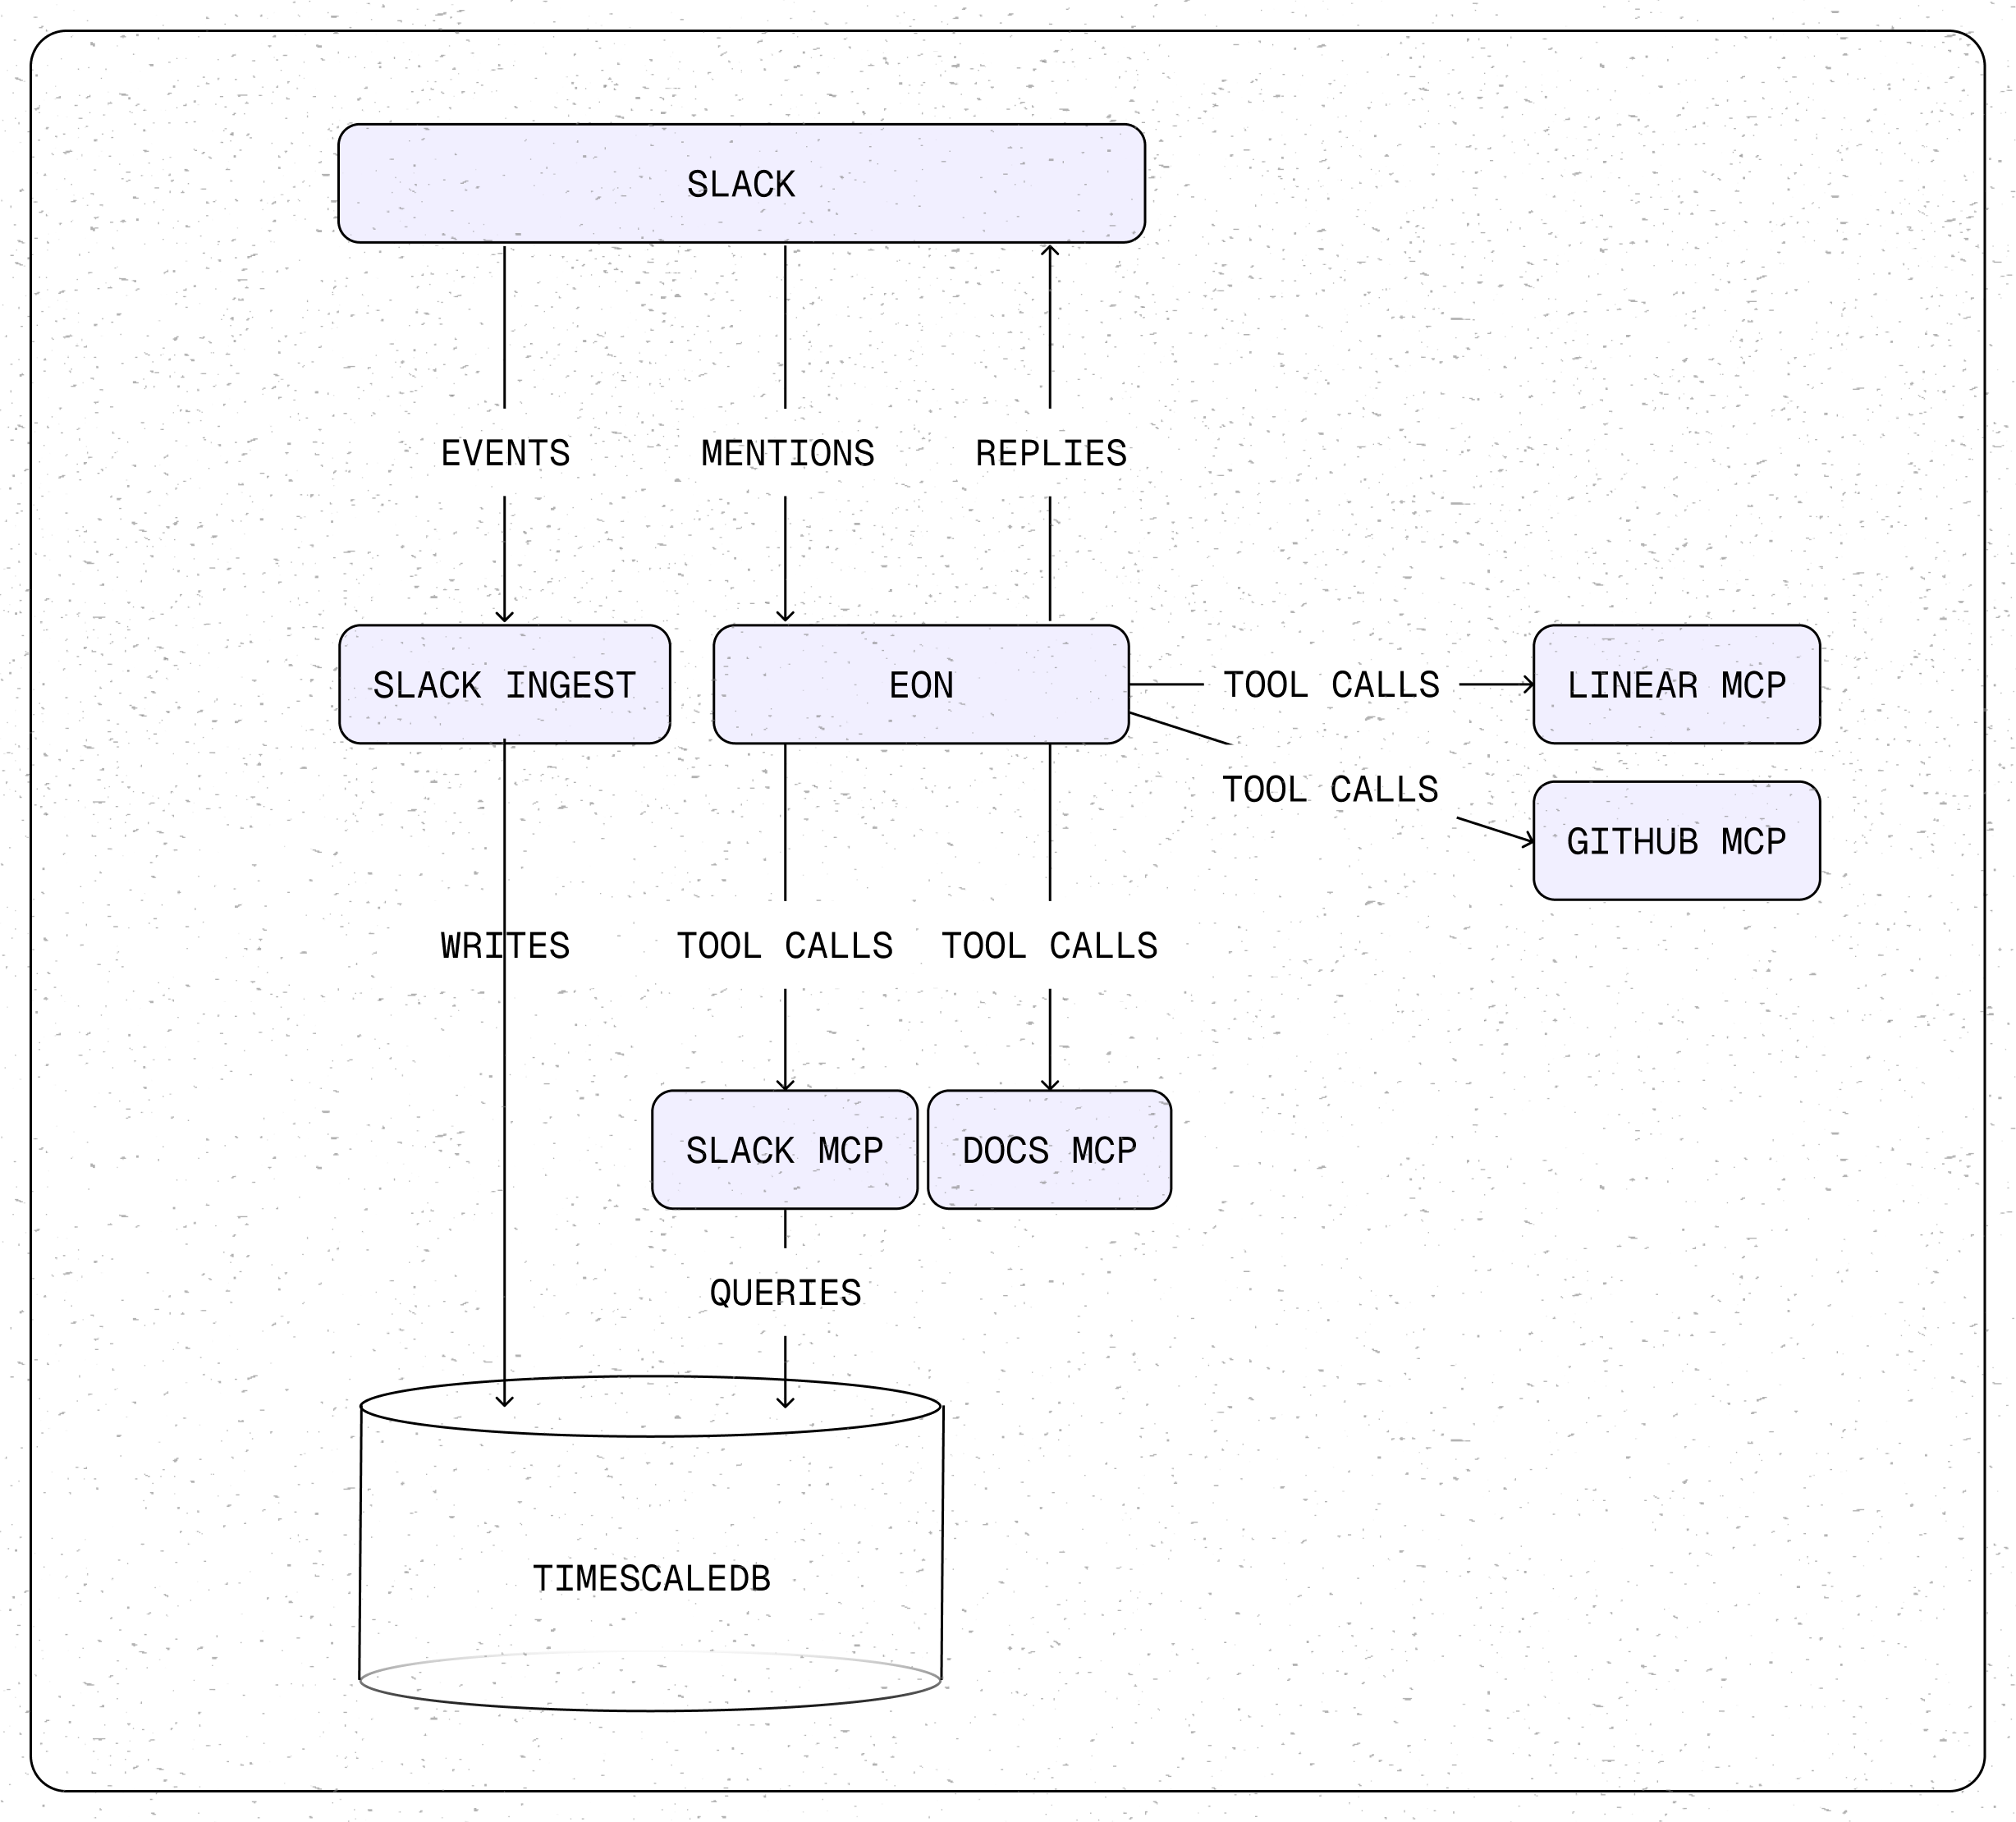
At its core, Eon is surprisingly simple. It's built on tiger-agents-for-work for reliable event handling, uses tiger-slack for conversational memory, and plugs in MCP servers to access GitHub, Linear, and documentation. Everything runs as stateless services coordinated through Tiger Data.

The architecture looks like this:

  1. Slack app_mention events flow into the tiger-agents-for-work event queue
  2. Workers claim events and invoke the Eon agent
  3. Eon decides what information it needs and calls the appropriate MCP servers (e.g., Slack history, GitHub PRs, documentation, etc.).
  4. MCP servers query their respective data sources and return structured results
  5. Eon synthesizes the information and responds in Slack

Configuration, Not Code (Unless You Want To)

One of our design goals was to make Eon easy to customize without writing code. The entire setup is driven by configuration files, not Python modules you need to understand and modify.

Want to add a new data source? Add an MCP server to your mcp_config.json. Want to change how Eon introduces itself? Edit a Jinja2 template. Want to swap out Claude for a different LLM? Change a CLI argument or environment variable. The architecture separates concerns: configuration data defines what Eon can do, while the code handles how it does it.

We provide an interactive setup script that walks you through the entire process. It prompts for your API tokens, generates the configuration files, and spins up everything using Docker Compose backed by a database on the Tiger Cloud Free Plan. From git clone to a working agent answering questions in Slack: approximately 10 minutes.

However, when you need to dive deeper, customize business logic, specialize tool selection, or prefetch context from internal systems, tiger-agents-for-work is a library, not just a CLI. Subclass the base agent, override its methods, and you have full programmatic control. The framework handles the production infrastructure (durable queues, retries, concurrency) while you focus on the logic that's specific to your needs.

The result: you can get an agent running quickly, then evolve it into something completely custom without rewriting the foundation.

From What We Learned to What You Can Build

Building Eon taught us something important: AI agents don't need exotic infrastructure. They need durable event handling, structured memory, and focused tools. Agentic Postgres provides the foundation, built on the operational maturity and ecosystem of Postgres that most teams already have.

And we didn't build a demo or a prototype. We built production infrastructure that our company depends on daily. Now we're releasing everything as open-source, composable components you can deploy together or separately. 

Start with tiger-eon, our reference implementation. Clone it, run the interactive setup script, and you’ll have a working agent answering questions in your Slack workspace in minutes.

Go deeper with the components:

Each repository includes setup instructions and can be run in a Docker container. Use them together to replicate what we built, or mix and match to create something entirely new.

This is the first project from our team, marking the beginning of a larger journey. We will continue to build more agentic capabilities and infrastructure, making it easier for developers to build AI applications all on Postgres.

Agents are coming online, and with Tiger Data, they finally have the database built for them.

(If you build with Eon, show us what you’ve made. Open an issue, submit a PR, share it on social media, or join our community Slack to chat with Eon, it’s live and answering TimescaleDB questions.)


About the author

John Pruitt

John Pruitt is a Staff Engineer on the AI team at Tiger Data, where he builds AI-native applications and tools on Postgres. With over 22 years of professional experience, John has spent his career building greenfield systems with small teams under tight timelines, often requiring novel solutions that still had to be production-grade from day one.

Prior to Tiger Data, John led software engineering, data warehousing, and database administration efforts primarily in the financial services and power industries. Throughout his career, he's worked extensively with relational databases and time-series workloads, including building a bi-temporal database model from scratch on Postgres. It's this deep background that makes him particularly passionate about using PostgreSQL for bleeding-edge AI applications.

John holds a Bachelor of Software Engineering from Auburn University and a Master of Engineering from UAB.


Read the whole story
karambir
13 hours ago
reply
New Delhi, India
Share this story
Delete

Qwen3-Coder: Agentic Coding in the World

1 Share

Qwen3-Coder: Agentic Coding in the World

It turns out that as I was typing up my notes on Qwen3-235B-A22B-Instruct-2507 the Qwen team were unleashing something much bigger:

Today, we’re announcing Qwen3-Coder, our most agentic code model to date. Qwen3-Coder is available in multiple sizes, but we’re excited to introduce its most powerful variant first: Qwen3-Coder-480B-A35B-Instruct — a 480B-parameter Mixture-of-Experts model with 35B active parameters which supports the context length of 256K tokens natively and 1M tokens with extrapolation methods, offering exceptional performance in both coding and agentic tasks.

This is another Apache 2.0 licensed open weights model, available as Qwen3-Coder-480B-A35B-Instruct and Qwen3-Coder-480B-A35B-Instruct-FP8 on Hugging Face.

I used qwen3-coder-480b-a35b-instruct on the Hyperbolic playground to run my "Generate an SVG of a pelican riding a bicycle" test prompt:

The bicycle has no spokes. The pelican is light yellow and is overlapping the middle of the bicycle, not perching on it - it has a large yellow beak and a weird red lower beak or wattle.

I actually slightly prefer the one I got from qwen3-235b-a22b-07-25.

In addition to the new model, Qwen released their own take on an agentic terminal coding assistant called qwen-code, which they describe in their blog post as being "Forked from Gemini Code" (they mean gemini-cli) - which is Apache 2.0 so a fork is in keeping with the license.

They focused really hard on code performance for this release, including generating synthetic data tested using 20,000 parallel environments on Alibaba Cloud:

In the post-training phase of Qwen3-Coder, we introduced long-horizon RL (Agent RL) to encourage the model to solve real-world tasks through multi-turn interactions using tools. The key challenge of Agent RL lies in environment scaling. To address this, we built a scalable system capable of running 20,000 independent environments in parallel, leveraging Alibaba Cloud’s infrastructure. The infrastructure provides the necessary feedback for large-scale reinforcement learning and supports evaluation at scale. As a result, Qwen3-Coder achieves state-of-the-art performance among open-source models on SWE-Bench Verified without test-time scaling.

To further burnish their coding credentials, the announcement includes instructions for running their new model using both Claude Code and Cline using custom API base URLs that point to Qwen's own compatibility proxies.

Pricing for Qwen's own hosted models (through Alibaba Cloud) looks competitive. This is the first model I've seen that sets different prices for four different sizes of input:

Pricing table with three columns showing Input token count (0-32K, 32K-128K, 128K-256K, 256K-1M), Input price (Million tokens) ($1, $1.8, $3, $6), and Output price (Million tokens) ($5, $9, $15, $60)

This kind of pricing reflects how inference against longer inputs is more expensive to process. Gemini 2.5 Pro has two different prices for above or below 200,00 tokens.

Via @Alibaba_Qwen

Tags: ai, generative-ai, llms, ai-assisted-programming, qwen, llm-pricing, llm-release, coding-agents

Read the whole story
karambir
100 days ago
reply
New Delhi, India
Share this story
Delete

Introducing pay per crawl: enabling content owners to charge AI crawlers for access

1 Share

A changing landscape of consumption 

Many publishers, content creators and website owners currently feel like they have a binary choice — either leave the front door wide open for AI to consume everything they create, or create their own walled garden. But what if there was another way?

At Cloudflare, we started from a simple principle: we wanted content creators to have control over who accesses their work. If a creator wants to block all AI crawlers from their content, they should be able to do so. If a creator wants to allow some or all AI crawlers full access to their content for free, they should be able to do that, too. Creators should be in the driver’s seat.

After hundreds of conversations with news organizations, publishers, and large-scale social media platforms, we heard a consistent desire for a third path: They’d like to allow AI crawlers to access their content, but they’d like to get compensated. Currently, that requires knowing the right individual and striking a one-off deal, which is an insurmountable challenge if you don’t have scale and leverage. 

What if I could charge a crawler? 

We believe your choice need not be binary — there should be a third, more nuanced option: You can charge for access. Instead of a blanket block or uncompensated open access, we want to empower content owners to monetize their content at Internet scale.

We’re excited to help dust off a mostly forgotten piece of the web: HTTP response code 402.

Introducing pay per crawl

Pay per crawl, in private beta, is our first experiment in this area. 

Pay per crawl integrates with existing web infrastructure, leveraging HTTP status codes and established authentication mechanisms to create a framework for paid content access. 

Each time an AI crawler requests content, they either present payment intent via request headers for successful access (HTTP response code 200), or receive a 402 Payment Required response with pricing. Cloudflare acts as the Merchant of Record for pay per crawl and also provides the underlying technical infrastructure.

Publisher controls and pricing

Pay per crawl grants domain owners full control over their monetization strategy. They can define a flat, per-request price across their entire site. Publishers will then have three distinct options for a crawler:

  • Allow: Grant the crawler free access to content.

  • Charge: Require payment at the configured, domain-wide price.

  • Block: Deny access entirely, with no option to pay.

An important mechanism here is that even if a crawler doesn’t have a billing relationship with Cloudflare, and thus couldn’t be charged for access, a publisher can still choose to ‘charge’ them. This is the functional equivalent of a network level block (an HTTP 403 Forbidden response where no content is returned) — but with the added benefit of telling the crawler there could be a relationship in the future. 

While publishers currently can define a flat price across their entire site, they retain the flexibility to bypass charges for specific crawlers as needed. This is particularly helpful if you want to allow a certain crawler through for free, or if you want to negotiate and execute a content partnership outside the pay per crawl feature. 

To ensure integration with each publisher’s existing security posture, Cloudflare enforces Allow or Charge decisions via a rules engine that operates only after existing WAF policies and bot management or bot blocking features have been applied.

Payment headers and access

As we were building the system, we knew we had to solve an incredibly important technical challenge: ensuring we could charge a specific crawler, but prevent anyone from spoofing that crawler. Thankfully, there’s a way to do this using Web Bot Auth proposals.

For crawlers, this involves:

  • Generating an Ed25519 key pair, and making the JWK-formatted public key available in a hosted directory

  • Registering with Cloudflare to provide the URL of your key directory and user agent information.

  • Configuring your crawler to use HTTP Message Signatures with each request.

Once registration is accepted, crawler requests should always include signature-agent, signature-input, and signature headers to identify your crawler and discover paid resources.

GET /example.html
Signature-Agent: "https://signature-agent.example.com"
Signature-Input: sig2=("@authority" "signature-agent")
 ;created=1735689600
 ;keyid="poqkLGiymh_W0uP6PZFw-dvez3QJT5SolqXBCW38r0U"
 ;alg="ed25519"
 ;expires=1735693200
;nonce="e8N7S2MFd/qrd6T2R3tdfAuuANngKI7LFtKYI/vowzk4lAZYadIX6wW25MwG7DCT9RUKAJ0qVkU0mEeLElW1qg=="
 ;tag="web-bot-auth"
Signature: sig2=:jdq0SqOwHdyHr9+r5jw3iYZH6aNGKijYp/EstF4RQTQdi5N5YYKrD+mCT1HA1nZDsi6nJKuHxUi/5Syp3rLWBA==:

Accessing paid content

Once a crawler is set up, determination of whether content requires payment can happen via two flows:

Reactive (discovery-first)

Should a crawler request a paid URL, Cloudflare returns an HTTP 402 Payment Required response, accompanied by a crawler-price header. This signals that payment is required for the requested resource.

HTTP 402 Payment Required
crawler-price: USD XX.XX

 The crawler can then decide to retry the request, this time including a crawler-exact-price header to indicate agreement to pay the configured price.

GET /example.html
crawler-exact-price: USD XX.XX 

Proactive (intent-first)

Alternatively, a crawler can preemptively include a crawler-max-price header in its initial request.

GET /example.html
crawler-max-price: USD XX.XX

If the price configured for a resource is equal to or below this specified limit, the request proceeds, and the content is served with a successful HTTP 200 OK response, confirming the charge:

HTTP 200 OK
crawler-charged: USD XX.XX 
server: cloudflare

If the amount in a crawler-max-price request is greater than the content owner’s configured price, only the configured price is charged. However, if the resource’s configured price exceeds the maximum price offered by the crawler, an HTTP 402 Payment Required response is returned, indicating the specified cost.  Only a single price declaration header, crawler-exact-price or crawler-max-price, may be used per request.

The crawler-exact-price or crawler-max-price headers explicitly declare the crawler's willingness to pay. If all checks pass, the content is served, and the crawl event is logged. If any aspect of the request is invalid, the edge returns an HTTP 402 Payment Required response.

Financial settlement

Crawler operators and content owners must configure pay per crawl payment details in their Cloudflare account. Billing events are recorded each time a crawler makes an authenticated request with payment intent and receives an HTTP 200-level response with a crawler-charged header. Cloudflare then aggregates all the events, charges the crawler, and distributes the earnings to the publisher.

Content for crawlers today, agents tomorrow 

At its core, pay per crawl begins a technical shift in how content is controlled online. By providing creators with a robust, programmatic mechanism for valuing and controlling their digital assets, we empower them to continue creating the rich, diverse content that makes the Internet invaluable. 

We expect pay per crawl to evolve significantly. It’s very early: we believe many different types of interactions and marketplaces can and should develop simultaneously. We are excited to support these various efforts and open standards.

For example, a publisher or new organization might want to charge different rates for different paths or content types. How do you introduce dynamic pricing based not only upon demand, but also how many users your AI application has? How do you introduce granular licenses at internet scale, whether for training, inference, search, or something entirely new?

The true potential of pay per crawl may emerge in an agentic world. What if an agentic paywall could operate entirely programmatically? Imagine asking your favorite deep research program to help you synthesize the latest cancer research or a legal brief, or just help you find the best restaurant in Soho — and then giving that agent a budget to spend to acquire the best and most relevant content. By anchoring our first solution on HTTP response code 402, we enable a future where intelligent agents can programmatically negotiate access to digital resources. 

Getting started

Pay per crawl is currently in private beta. We’d love to hear from you if you’re either a crawler interested in paying to access content or a content creator interested in charging for access. You can reach out to us at http://www.cloudflare.com/paypercrawl-signup/ or contact your Account Executive if you’re an existing Enterprise customer.

Read the whole story
karambir
121 days ago
reply
New Delhi, India
Share this story
Delete

Quoting Kent Beck

1 Share

So you can think really big thoughts and the leverage of having those big thoughts has just suddenly expanded enormously. I had this tweet two years ago where I said "90% of my skills just went to zero dollars and 10% of my skills just went up 1000x". And this is exactly what I'm talking about - having a vision, being able to set milestones towards that vision, keeping track of a design to maintain or control the levels of complexity as you go forward. Those are hugely leveraged skills now compared to knowing where to put the amperands and the stars and the brackets in Rust.

Kent Beck, interview with Gergely Orosz

Tags: gergely-orosz, ai-assisted-programming, ai, careers

Read the whole story
karambir
130 days ago
reply
New Delhi, India
Share this story
Delete

Backup for my home server with restic and resticprofile

1 Share

Recently, I did myself a favor and bought a little Beelink SER5 Pro Mini PC a home server to run some services I use on my home network and also to run some development containers.

With this shiny new home server, I also wanted to set up some offsite backups for it. I asked on Mastodon for suggestions and got tips to use borgbackup and restic. Both are reasonable suggestions with great documentation.

After some research, I decided to go with restic and resticprofile. The deciding factor was that Hetzner, whose new S3-compatible object storage I wanted to use, had a documentation for using restic.

Installing restic and resticprofile

I run Debian Bookworm on my home server, so the installation of restic was pretty easy with apt install restic. To install resticprofile, I used the guide for linux and ran the following commands:

curl -LO https://raw.githubusercontent.com/creativeprojects/resticprofile/master/install.sh
chmod +x install.sh
sudo ./install.sh -b /usr/local/bin

Configuring backups

First off, I had to configure S3 credentials and set up a S3 bucket on the Hetzner cloud.

Depending on the location chosen, the endpoint is one of

  • fsn1.your-objectstorage.com (Falkenstein)
  • nbg1.your-objectstorage.com (Nuremberg)
  • hel1.your-objectstorage.com (Helsinki)

My server has just a small 500 GB SSD disk so far, so I decided to go with a single backup configuration that backups the whole device with some exceptions. The backup is scheduled at midnight and the cleanup process at half past midnight.

The configuration file is pretty straightforward and easy. I placed it in the one of the default locations /usr/local/etc/resticprofile/profiles.yaml.

# yaml-language-server: $schema=https://creativeprojects.github.io/resticprofile/jsonschema/config-1.json

version: '1'

default:
  repository: 's3:https://<Endpoint of the bucket>/<Name of the S3 Bucket>'
  initialize: true
  env:
    AWS_ACCESS_KEY_ID: <Your Access Key>
    AWS_SECRET_ACCESS_KEY: <Your Secret Key>
    RESTIC_PASSWORD: <Some long and cryptic string>
  backup:
    source:
      - /
    exclude:
      - /dev
      - /media
      - /mnt
      - /proc
      - /run
      - /sys
      - /tmp
      - /var/cache
      - /var/lib/docker
      - .cache
    schedule-permission: system
    schedule-log: "/var/log/resticprofile/homeserver-backup.log"
    # Every day at midnight
    schedule: "*-*-* 00:00:00"
  forget:
    # Keep the last 10 snapshots
    keep-last: 10
    prune: true
    schedule-permission: system
    schedule-log: "/var/log/resticprofile/homeserver-forget.log"
    # Every day at half past midnight
    schedule: "*-*-* 00:30:00"

Initialize and do your first backup

To do the initialization of the repository and run my first backup, I had to call the following two commands.

resticprofile init
resticprofile backup 

Scheduling backups

Finally, a lazy guy like me wants a regular process for his backup. resticprofile has a handy command to install a scheduler for me that obeys the rules configured in the profiles.yaml above.

resticprofile schedule

Done!

Read the whole story
karambir
292 days ago
reply
New Delhi, India
Share this story
Delete

My (ideal) uv based Dockerfile

1 Share

When I fully switched to uv last week, I had the issue to solve, that I had to change my default Dockerfile too. First, I read Hynek’s article on production-ready Docker containers with uv. Then I stumbled across Michael’s article on Docker containers using uv. Both articles are great and gave me a lot of insight what I had to change after switching from Poetry to uv.

My plan and requirements:

  • Embrace uv sync for installing
  • Install Python using uv
  • A multi-stage built
  • Support my Django projects

Ok, “ideal” might be a big too bold as a statement, but I currently enjoy this 4-stage Dockerfile to building my production containers for various services — small and big. At the very end, you can find the complete files from my django-startproject template.

Stage 1: The Debian base system

# Stage 1: General debian environment
FROM debian:stable-slim AS linux-base

# Assure UTF-8 encoding is used.
ENV LC_CTYPE=C.utf8
# Location of the virtual environment
ENV UV_PROJECT_ENVIRONMENT="/venv"
# Location of the python installation via uv
ENV UV_PYTHON_INSTALL_DIR="/python"
# Byte compile the python files on installation
ENV UV_COMPILE_BYTECODE=1
# Python verision to use
ENV UV_PYTHON=python3.12
# Tweaking the PATH variable for easier use
ENV PATH="$UV_PROJECT_ENVIRONMENT/bin:$PATH"

# Update debian
RUN apt-get update
RUN apt-get upgrade -y

# Install general required dependencies
RUN apt-get install --no-install-recommends -y tzdata
Dockerfile

Stage 1 builds the basis for all the other stages and consists basically of a stable Debian image with some environment variables to tweak uv, necessary updates and tzdata. This stage more or less never changes and stays in the cache.

Stage 2: The Python environment

# Stage 2: Python environment
FROM linux-base AS python-base

# Install debian dependencies
RUN apt-get install --no-install-recommends -y build-essential gettext

# Install uv
COPY --from=ghcr.io/astral-sh/uv:latest /uv /usr/local/bin/uv

# Create virtual environment and install dependencies
COPY pyproject.toml ./
COPY uv.lock ./
RUN uv sync --frozen --no-dev --no-install-project
Dockerfile

It is far too easy and fast to set up a working Python environment than I could skip this step. And why should I do something else than I do on my development machine?

uv sync does it all in a single step — install Python, set up a virtual environment and install all the dependencies from my Django project.

This step also installs some Debian packages that I need during the build process, but not in the production container.

This stage also changes not that often — only when I add new dependencies to the project.

Stage 3: Building environment

# Stage 3: Building environment
FROM python-base AS builder-base

WORKDIR /app
COPY . /app

# Build static files
RUN python manage.py tailwind build
RUN python manage.py collectstatic --no-input

# Compile translation files
RUN python manage.py compilemessages
Dockerfile

This stage might be optional for many people, but for me, it is an essential step in the build process.

I enjoy using Tailwind CSS and want to build the production CSS file as late as possible. I don’t like it, if it gets checked in because it is automatically rebuilt during development anyway.

My apps normally have to support German, English, and French. So translation files have to be compiled too. Again, I don’t like it, when these files are part of the git repository.

If you don’t use Tailwind and aren’t concerned about i18n, just remove the corresponding lines.

Stage 4: Production layer

# Stage 4: Webapp environment
FROM linux-base AS webapp

# Copy python, virtual env and static assets
COPY --from=builder-base $UV_PYTHON_INSTALL_DIR $UV_PYTHON_INSTALL_DIR
COPY --from=builder-base $UV_PROJECT_ENVIRONMENT $UV_PROJECT_ENVIRONMENT
COPY --from=builder-base --exclude=uv.lock --exclude=pyproject.toml /app /app

# Start the application server
WORKDIR /app
EXPOSE 8000
CMD ["docker/entrypoint.sh"]
Dockerfile

The final stage is again based on the base Debian layer from stage 1 and just copies the relevant files from the building environment – Python, the virtual environment and my application code.

To use the –exclude flag, I have to define the syntax of the Dockerfile at the start of it.

# syntax=docker.io/docker/dockerfile:1.7-labs
Dockerfile

Summary

For me, the above steps fulfill all my requirements, the caching works nicely, and the build time is fast. Usually, only stage 3 and stage 4 have to be built. The result is, that a new container is built in 1–2 seconds.

Complete Dockerfile and entrypoint.sh script

# syntax=docker.io/docker/dockerfile:1.7-labs

# Stage 1: General debian environment
FROM debian:stable-slim AS linux-base

# Assure UTF-8 encoding is used.
ENV LC_CTYPE=C.utf8
# Location of the virtual environment
ENV UV_PROJECT_ENVIRONMENT="/venv"
# Location of the python installation via uv
ENV UV_PYTHON_INSTALL_DIR="/python"
# Byte compile the python files on installation
ENV UV_COMPILE_BYTECODE=1
# Python verision to use
ENV UV_PYTHON=python3.12
# Tweaking the PATH variable for easier use
ENV PATH="$UV_PROJECT_ENVIRONMENT/bin:$PATH"

# Update debian
RUN apt-get update
RUN apt-get upgrade -y

# Install general required dependencies
RUN apt-get install --no-install-recommends -y tzdata

# Stage 2: Python environment
FROM linux-base AS python-base

# Install debian dependencies
RUN apt-get install --no-install-recommends -y build-essential gettext

# Install uv
COPY --from=ghcr.io/astral-sh/uv:latest /uv /usr/local/bin/uv

# Create virtual environment and install dependencies
COPY pyproject.toml ./
COPY uv.lock ./
RUN uv sync --frozen --no-dev --no-install-project

# Stage 3: Building environment
FROM python-base AS builder-base

WORKDIR /app
COPY . /app

# Build static files
RUN python manage.py tailwind build
RUN python manage.py collectstatic --no-input

# Compile translation files
RUN python manage.py compilemessages

# Stage 4: Webapp environment
FROM linux-base AS webapp

# Copy python, virtual env and static assets
COPY --from=builder-base $UV_PYTHON_INSTALL_DIR $UV_PYTHON_INSTALL_DIR
COPY --from=builder-base $UV_PROJECT_ENVIRONMENT $UV_PROJECT_ENVIRONMENT
COPY --from=builder-base --exclude=uv.lock --exclude=pyproject.toml /app /app

# Start the application server
WORKDIR /app
EXPOSE 8000
CMD ["docker/entrypoint.sh"]
Dockerfile

My choice of entry point script might raise some discussion. I know that many people don’t enjoy running migrations on startup of the container. For me, this has worked for years. And which WSGI server you use is up to you. I currently enjoy granian. Before that, I have used gunicorn and uwsgi. Use whatever fits your requirements.

#!/usr/bin/env bash

# https://gist.github.com/mohanpedala/1e2ff5661761d3abd0385e8223e16425
set -euxo pipefail

echo "Migrate database..."
python manage.py migrate

echo "Start granian..."
granian {{ project_name }}.wsgi:application \
    --host 0.0.0.0 \
    --port 8000 \
    --interface wsgi \
    --no-ws \
    --loop uvloop \
    --process-name \
    "granian [{{ project_name }}]"
Bash
Read the whole story
karambir
377 days ago
reply
New Delhi, India
Share this story
Delete
Next Page of Stories